> ## Documentation Index
> Fetch the complete documentation index at: https://docs.omi.me/llms.txt
> Use this file to discover all available pages before exploring further.
# Update Omi Firmware
> Keep your Omi device up to date with the latest firmware. Use the app for easy updates or follow the manual process.
## Overview
There are two ways to update your Omi device firmware:
**Recommended** - The easiest way to update
Go to **Settings → Device Settings → Update Firmware**
For advanced users or troubleshooting
Follow the instructions below for your device
## Manual Update for DevKit
**Bootloader** (required for first-time setup or if corrupted):
* Download [bootloader0.9.0.uf2](https://github.com/BasedHardware/omi/releases/download/v2.0.1-Omi/bootloader0.9.0.uf2)
* Compatible with Seeed XIAO nRF52840 Sense (SoftDevice S140 7.3.0)
**Firmware** (choose your device):
* [DevKit 1 Firmware](https://github.com/BasedHardware/omi/releases?q=release_firmware+DK1)
* [DevKit 2 Firmware](https://github.com/BasedHardware/omi/releases?q=release_firmware+DK2)
Before starting, ensure:
* Battery is above 50%
* Using a direct USB connection (avoid USB hubs)
* Have a small pin ready for the reset button
1. Connect your device via USB
2. Locate the reset button:
Remove the lid and find the button labeled "RST"
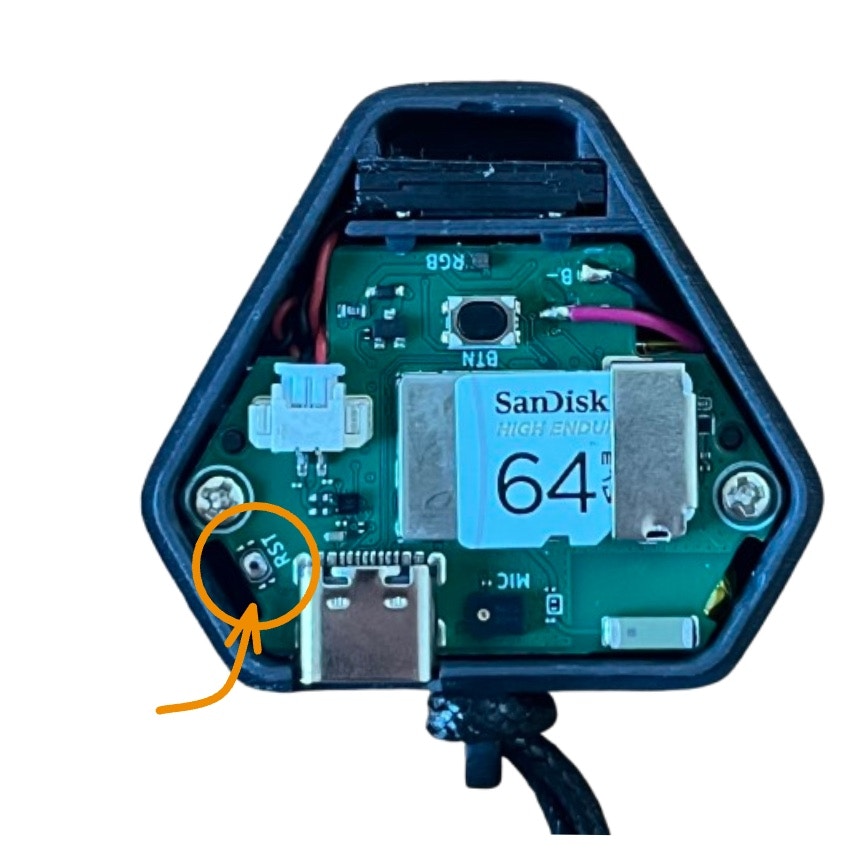 Use the button shown below
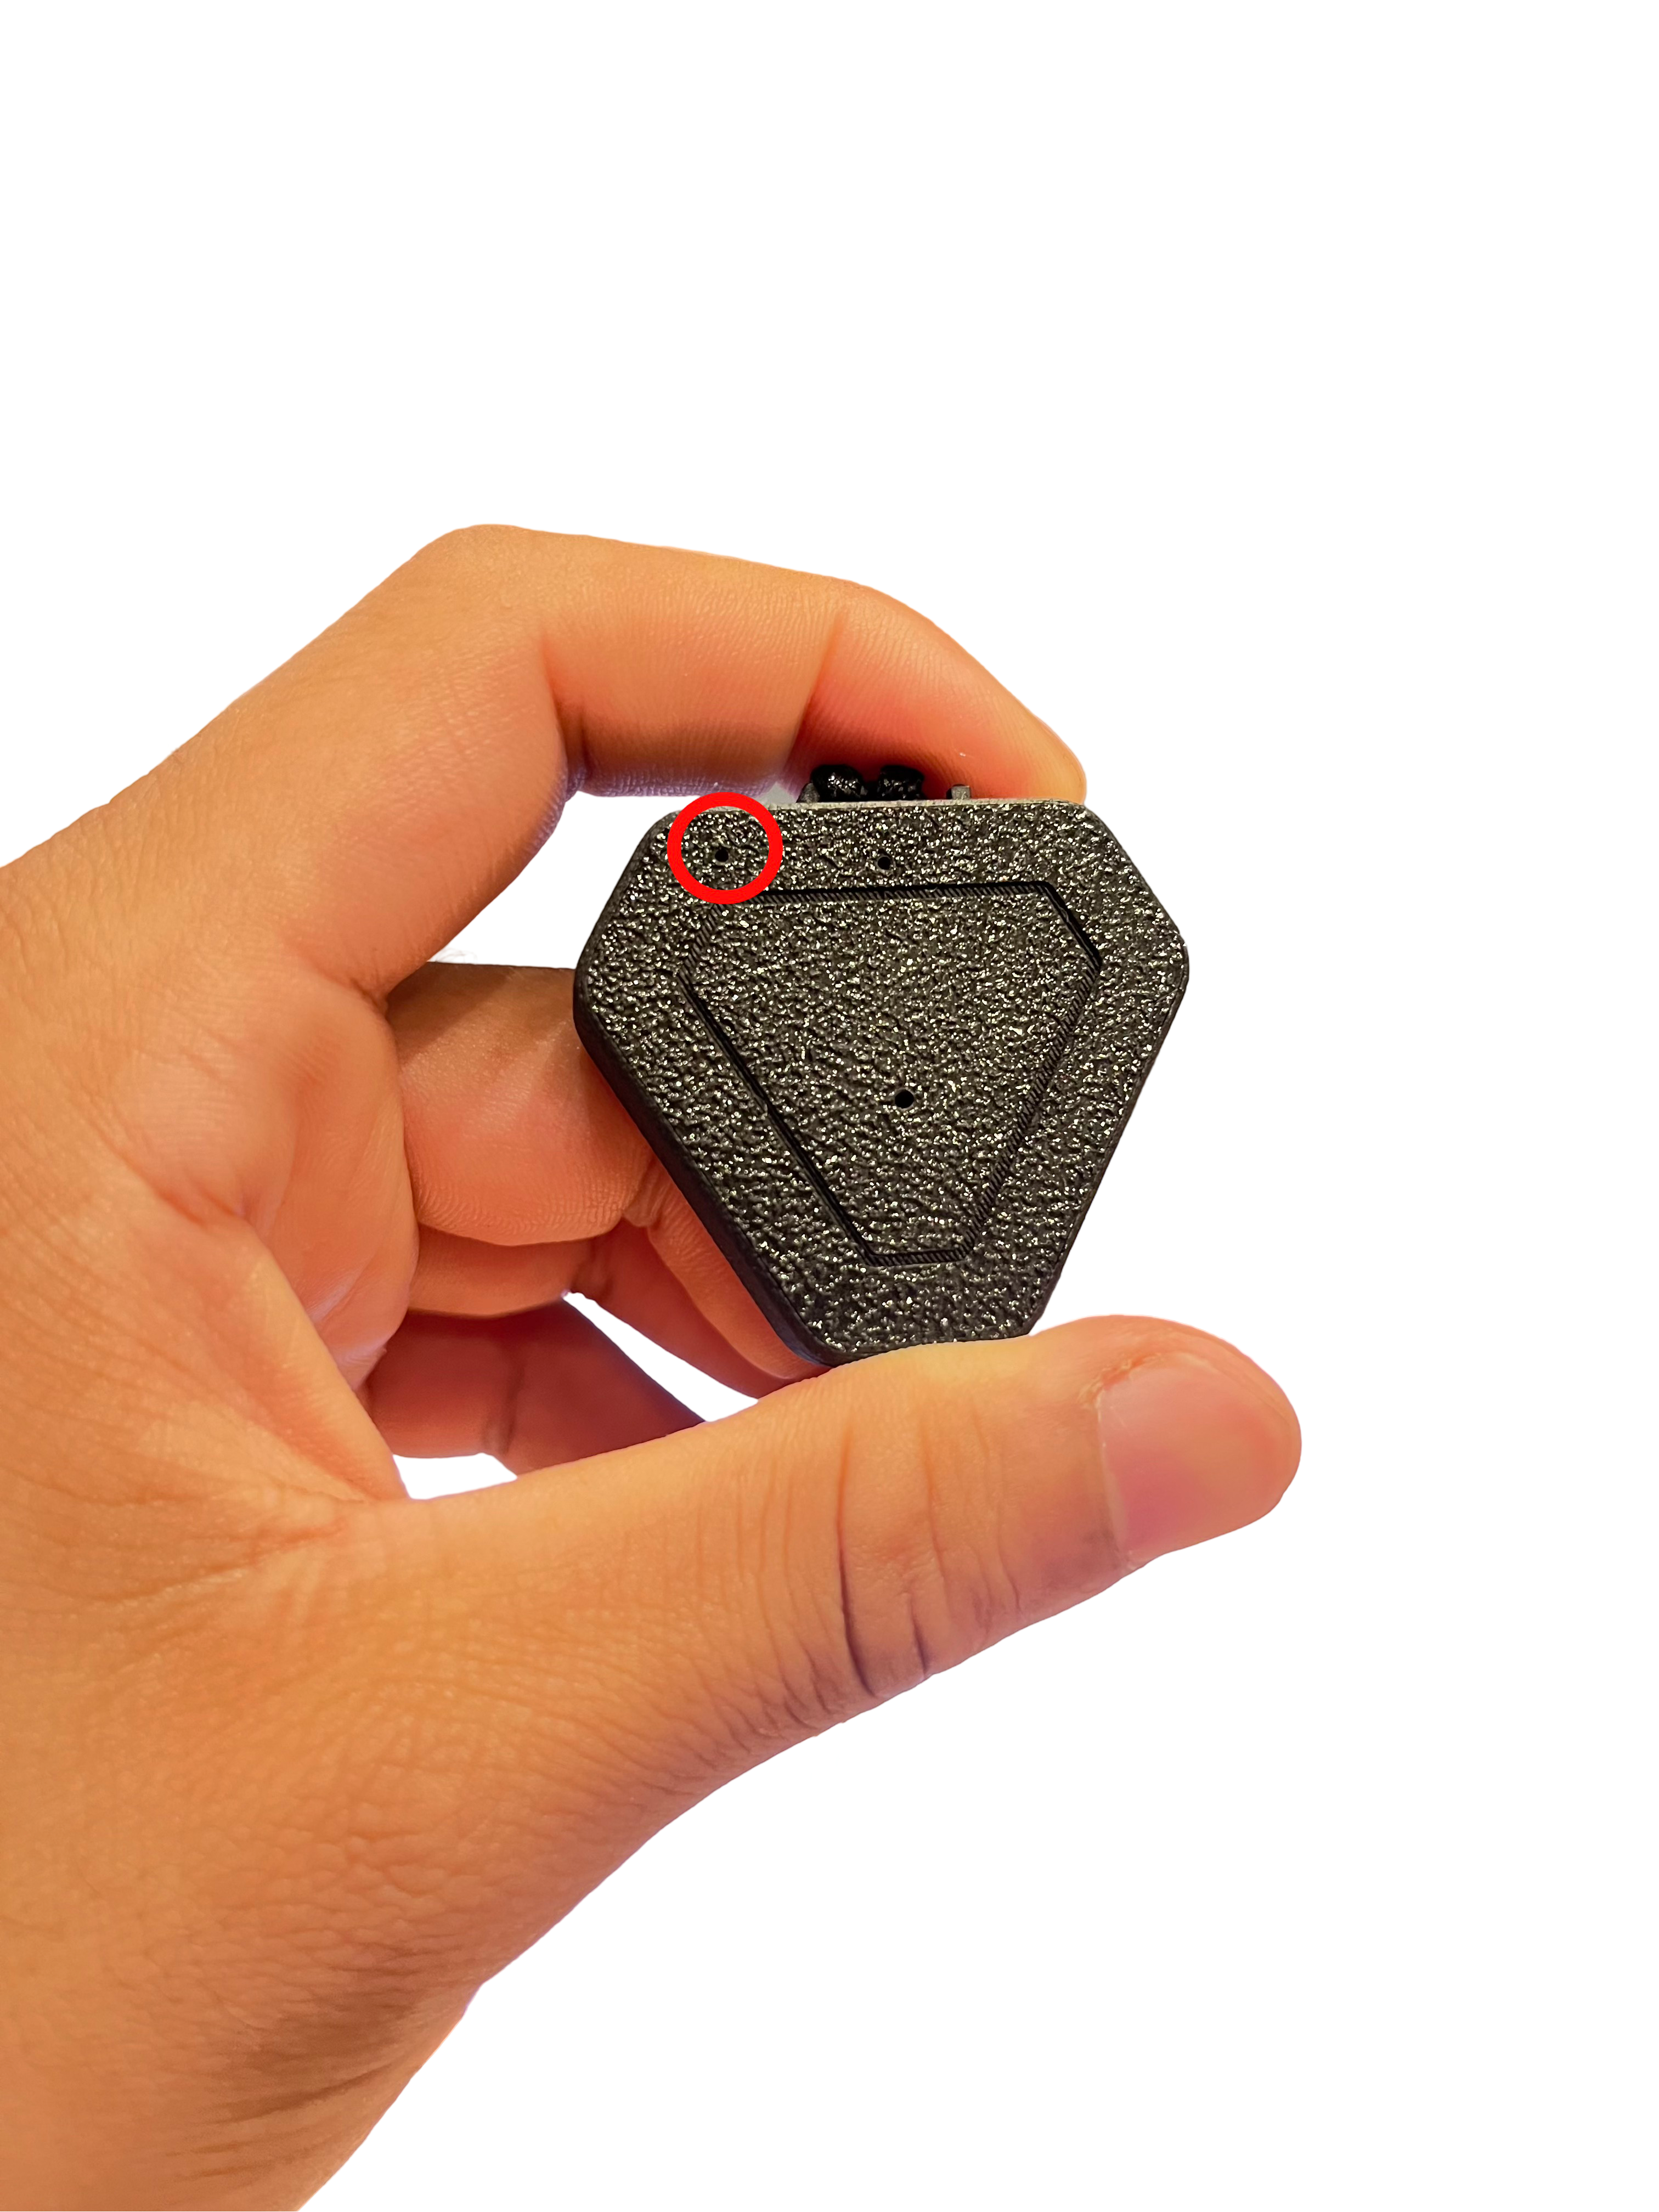 3. **Double-click** the reset button quickly
4. Your computer should show a drive named `/Volumes/XIAO-SENSE`
**Install Bootloader** (if needed):
1. Drag `bootloader0.9.0.uf2` to the `/Volumes/XIAO-SENSE` drive
2. Wait for the drive to eject automatically
3. Put device back in DFU mode (repeat step 3)
**Install Firmware**:
1. Drag the firmware `.uf2` file to the `/Volumes/XIAO-SENSE` drive
2. Wait for completion (ignore "transfer incomplete" messages)
3. Device will restart automatically
### Troubleshooting
* Try a different USB cable (some cables are charge-only)
* Try a different USB port
* Avoid USB hubs - connect directly to your computer
* Retry the process from the beginning
* Make sure battery is above 50%
* Try double-clicking the reset button faster
This is normal! Wait 30 seconds, then check if the device restarted successfully.
See the [DevKit2 Firmware Guide](https://help.omi.me/en/articles/9995941-updating-your-devkit2-firmware) for additional help.
## Flashing Consumer Version 1
CV1 requires a **special flashing cable** that connects to a J-Link programmer. Without this cable, the CV1 cannot be programmed.
### Prerequisites
* Omi CV1 device
* J-Link programmer
* Special SWD flashing cable
* USB cable
* [J-Link Software](https://www.segger.com/downloads/jlink/)
* Latest firmware files from GitHub
### Step 1: Download Latest Firmware
1. Go to [Omi GitHub Releases for CV1](https://github.com/BasedHardware/omi/releases?q=release_firmware+OMI+CV1)
2. Find the latest release
3. Download both files:
* `merged.hex` — Application core firmware
* `merged_CPUNET.hex` — Network core firmware
```bash theme={null}
cd MAC/
# Optional: Backup existing files
mv merged.hex merged.hex.backup
mv merged_CPUNET.hex merged_CPUNET.hex.backup
# Copy new firmware files to this folder
```
```cmd theme={null}
cd WINDOWS\
# Optional: Backup existing files
# Rename merged.hex → merged.hex.backup
# Rename merged_CPUNET.hex → merged_CPUNET.hex.backup
# Copy new firmware files to this folder
```
Ensure both files are updated:
* File sizes should match downloaded versions
* Modification dates should reflect the replacement
### Step 2: Flash the Firmware
1. Install J-Link Software from [SEGGER](https://www.segger.com/downloads/jlink/)
2. Navigate to the MAC folder and flash:
```bash theme={null}
cd MAC
# Flash network core first
JLinkExe -CommanderScript program_net.jlink
# Then flash application core
JLinkExe -CommanderScript program_app.jlink
```
1. Install J-Link Software from [SEGGER](https://www.segger.com/downloads/jlink/)
2. Add J-Link to your PATH (default: `C:\Program Files\SEGGER\JLink\`)
3. Navigate to the WINDOWS folder and flash:
```cmd theme={null}
cd WINDOWS
# Flash network core first
JLink.exe -CommanderScript program_net.jlink
# Then flash application core
JLink.exe -CommanderScript program_app.jlink
```
### Verification
If the LEDs start blinking after flashing, the update was successful! Confirm the firmware version in the Omi app.
### Troubleshooting
* Verify J-Link is installed correctly
* Check that the installation path is in your system PATH
* Try using the full path to the executable
* Try a different USB port or cable
* Ensure device is in programming mode
* Check that the flashing cable is properly connected
* Always flash the network core first
* Wait for each command to complete before running the next
* Ensure device has sufficient power
* Re-download the firmware files
* Verify file integrity (sizes should match GitHub)
* Check for file corruption during download
***
## Success!
Your Omi device is now updated with the latest firmware. Enjoy the enhanced features and improvements!
## Related Documentation
Step-by-step assembly instructions
Components needed to build Omi
Introduction to Omi
3. **Double-click** the reset button quickly
4. Your computer should show a drive named `/Volumes/XIAO-SENSE`
**Install Bootloader** (if needed):
1. Drag `bootloader0.9.0.uf2` to the `/Volumes/XIAO-SENSE` drive
2. Wait for the drive to eject automatically
3. Put device back in DFU mode (repeat step 3)
**Install Firmware**:
1. Drag the firmware `.uf2` file to the `/Volumes/XIAO-SENSE` drive
2. Wait for completion (ignore "transfer incomplete" messages)
3. Device will restart automatically
### Troubleshooting
* Try a different USB cable (some cables are charge-only)
* Try a different USB port
* Avoid USB hubs - connect directly to your computer
* Retry the process from the beginning
* Make sure battery is above 50%
* Try double-clicking the reset button faster
This is normal! Wait 30 seconds, then check if the device restarted successfully.
See the [DevKit2 Firmware Guide](https://help.omi.me/en/articles/9995941-updating-your-devkit2-firmware) for additional help.
## Flashing Consumer Version 1
CV1 requires a **special flashing cable** that connects to a J-Link programmer. Without this cable, the CV1 cannot be programmed.
### Prerequisites
* Omi CV1 device
* J-Link programmer
* Special SWD flashing cable
* USB cable
* [J-Link Software](https://www.segger.com/downloads/jlink/)
* Latest firmware files from GitHub
### Step 1: Download Latest Firmware
1. Go to [Omi GitHub Releases for CV1](https://github.com/BasedHardware/omi/releases?q=release_firmware+OMI+CV1)
2. Find the latest release
3. Download both files:
* `merged.hex` — Application core firmware
* `merged_CPUNET.hex` — Network core firmware
```bash theme={null}
cd MAC/
# Optional: Backup existing files
mv merged.hex merged.hex.backup
mv merged_CPUNET.hex merged_CPUNET.hex.backup
# Copy new firmware files to this folder
```
```cmd theme={null}
cd WINDOWS\
# Optional: Backup existing files
# Rename merged.hex → merged.hex.backup
# Rename merged_CPUNET.hex → merged_CPUNET.hex.backup
# Copy new firmware files to this folder
```
Ensure both files are updated:
* File sizes should match downloaded versions
* Modification dates should reflect the replacement
### Step 2: Flash the Firmware
1. Install J-Link Software from [SEGGER](https://www.segger.com/downloads/jlink/)
2. Navigate to the MAC folder and flash:
```bash theme={null}
cd MAC
# Flash network core first
JLinkExe -CommanderScript program_net.jlink
# Then flash application core
JLinkExe -CommanderScript program_app.jlink
```
1. Install J-Link Software from [SEGGER](https://www.segger.com/downloads/jlink/)
2. Add J-Link to your PATH (default: `C:\Program Files\SEGGER\JLink\`)
3. Navigate to the WINDOWS folder and flash:
```cmd theme={null}
cd WINDOWS
# Flash network core first
JLink.exe -CommanderScript program_net.jlink
# Then flash application core
JLink.exe -CommanderScript program_app.jlink
```
### Verification
If the LEDs start blinking after flashing, the update was successful! Confirm the firmware version in the Omi app.
### Troubleshooting
* Verify J-Link is installed correctly
* Check that the installation path is in your system PATH
* Try using the full path to the executable
* Try a different USB port or cable
* Ensure device is in programming mode
* Check that the flashing cable is properly connected
* Always flash the network core first
* Wait for each command to complete before running the next
* Ensure device has sufficient power
* Re-download the firmware files
* Verify file integrity (sizes should match GitHub)
* Check for file corruption during download
***
## Success!
Your Omi device is now updated with the latest firmware. Enjoy the enhanced features and improvements!
## Related Documentation
Step-by-step assembly instructions
Components needed to build Omi
Introduction to Omi