> ## Documentation Index
> Fetch the complete documentation index at: https://docs.omi.me/llms.txt
> Use this file to discover all available pages before exploring further.
# Assembly & BOM
> Bill of Materials and assembly reference for building the Omi from components.
## Bill of Materials
The BOM contains 88 components across the mainboard, charger board, FPC, and mechanical assembly.
**Download:**
* [CSV format](https://github.com/BasedHardware/omi/blob/main/omi/hardware/consumer/bom/omi-bom.csv)
* [XLSX format](https://github.com/BasedHardware/omi/blob/main/omi/hardware/consumer/bom/omi-bom.xlsx)
### Key Components
| Component | MPN | Manufacturer | Qty |
| ------------------- | ----------------------------- | -------------------- | --- |
| Main SoC | nRF5340-CLAA | Nordic Semiconductor | 1 |
| Wi-Fi IC | nRF7002-CEAA-R7 | Nordic Semiconductor | 1 |
| Microphones | MMICT5838-00-012 | TDK | 2 |
| 8GB NAND Flash | CSNP4GCR01-DPW | CS | 1 |
| 6-axis IMU | LSM6DS3TR-C | STMicroelectronics | 1 |
| Battery Charger | BQ25101YFPR | Texas Instruments | 1 |
| DC-DC Buck | TPS628438YKAR | Texas Instruments | 1 |
| Load Switch | TPS22916CYFPR | Texas Instruments | 2 |
| RF Switch | FM8625H | FUMAN | 1 |
| LDO 3.3V | SGM2036S-3.3XXDH4G/TR | SGMICRO | 1 |
| LDO 1.8V | SGM2036S-1.8XXDH4G/TR | SGMICRO | 1 |
| Crystal 40MHz | CJ17-400001010B20 | CJ | 1 |
| Crystal 32MHz | 1S32000049 | Faith Long | 1 |
| Crystal 32.768KHz | DST1610A | KDS | 1 |
| Battery | GRP1654M1-1C-1S1P-3.7V-150mAh | GERUIPU | 1 |
| Vibration Motor | LBM0525A4123F | LIDEWEI | 1 |
| RGB LED | MHPA0606RGBDT | MEIHUA | 2 |
| Pogo Pins (device) | CA02-PG07 | JINLANTIAN | 6 |
| Pogo Pins (charger) | CA62-PG308 | JINLANTIAN | 2 |
| Tactile Button | TS-1001S | JINBEILI | 1 |
### Passive Components
The mainboard uses 0201-size passives (resistors, capacitors) primarily from YAGEO and Murata. See the full BOM CSV for complete listings including designators.
**Sourcing tip for indie makers:** Order passives (0201 resistors/capacitors) from LCSC — they have the best prices and ship from China alongside your JLCPCB boards. For active ICs, Mouser/DigiKey have more reliable stock.
***
## Assembly Reference
### Exploded View
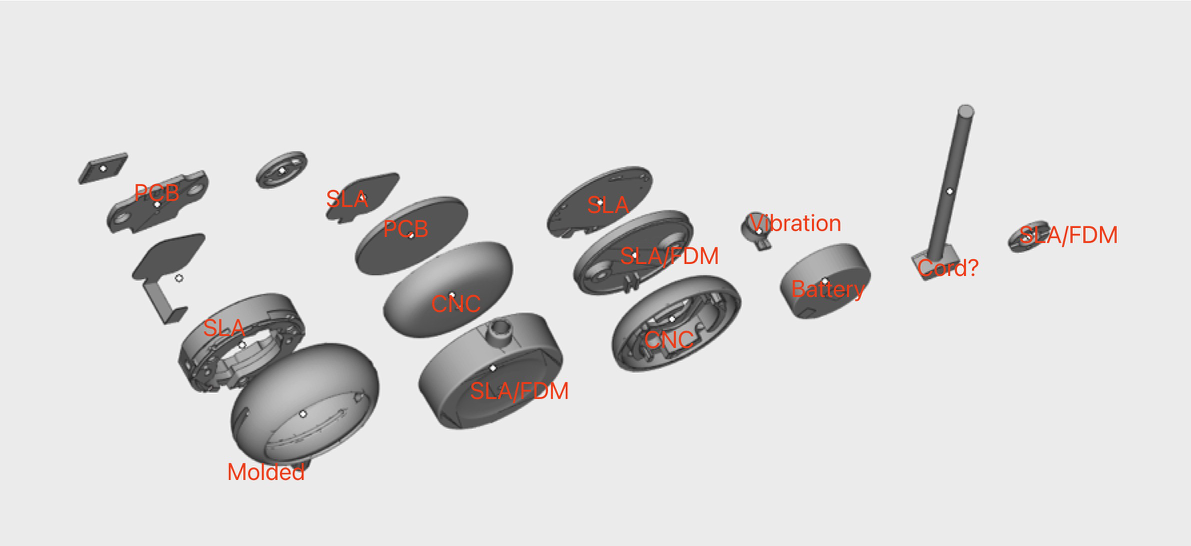 The device consists of these main assemblies:
1. **Front aluminium cover** (CNC machined)
2. **LED light guide** (SLA/translucent)
3. **Main frame** (SLA/translucent PC+ABS)
4. **PCB mainboard** with microphones, SoC, flash
5. **FPC** connecting to charging contacts
6. **Battery** (150mAh LiPo)
7. **Vibration motor**
8. **Silicone pad**
9. **Back aluminium cover** (CNC machined)
### Build Guide
The device consists of these main assemblies:
1. **Front aluminium cover** (CNC machined)
2. **LED light guide** (SLA/translucent)
3. **Main frame** (SLA/translucent PC+ABS)
4. **PCB mainboard** with microphones, SoC, flash
5. **FPC** connecting to charging contacts
6. **Battery** (150mAh LiPo)
7. **Vibration motor**
8. **Silicone pad**
9. **Back aluminium cover** (CNC machined)
### Build Guide
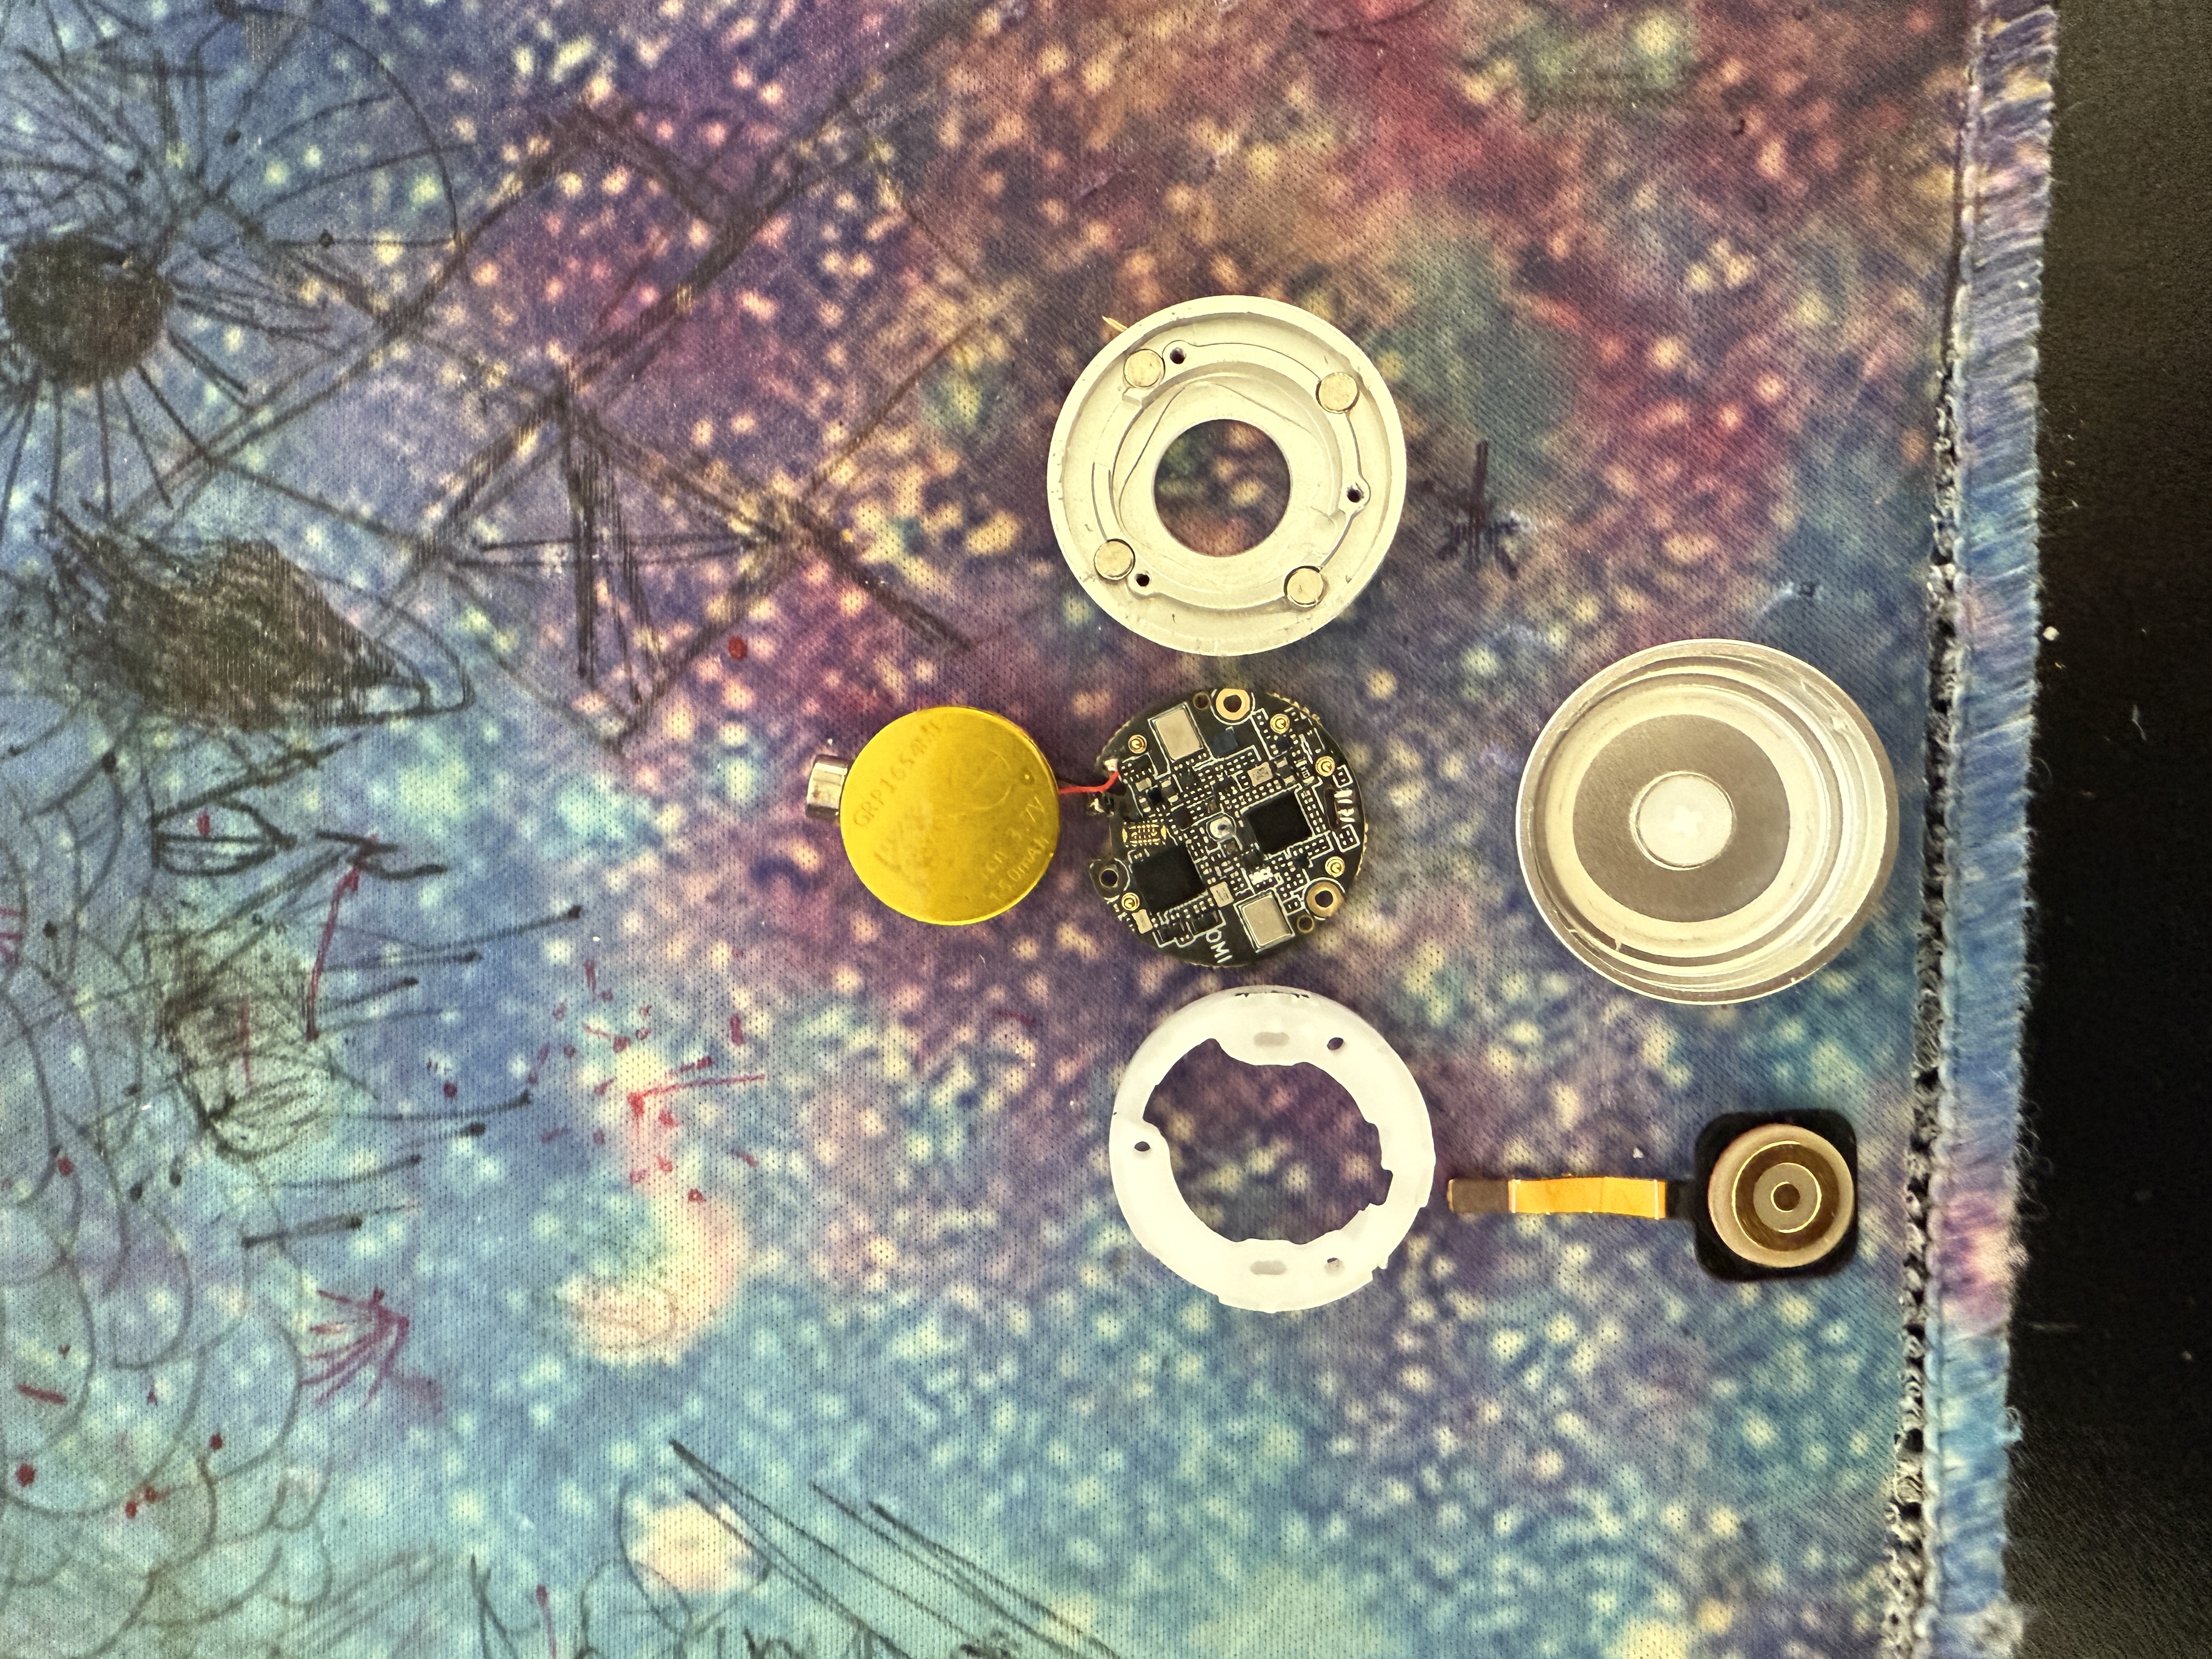 Lay out all components on an anti-static mat. You'll need: tweezers, Phillips screwdriver (PH000), UV lamp, multimeter, and S300 adhesive.
Place the mainboard PCB into the SLA frame on the mounting posts. Board should sit flat with no rocking. Connect the FPC cable to the board-to-board connector.
The FPC connector is fragile — lift the latch before inserting, then press down firmly to lock. Do not force it.
Plug in the 150mAh LiPo battery. Route the cable to avoid pinching. Attach the vibration motor with double-sided tape.
**Battery polarity is critical.** Reversed polarity will destroy the BQ25101 charger IC and may cause thermal runaway. Verify polarity with a multimeter before connecting.
Apply UV adhesive to magnet seats. Insert 4x N52 magnets (D3×H3mm). Cure with UV lamp for 30 seconds each.
Test magnet polarity against the charger dock BEFORE gluing. Mark each magnet with a Sharpie. Once cured, they cannot be removed.
Place the silicone pad over the battery/motor assembly.
Attach aluminium covers (Case A front, Case B back). Secure with 3x Phillips screws (CM1.2×5). Apply S300 glue around the seam.
Before sealing: test charging contact continuity, verify BLE advertising, confirm both mics record audio.
Power on the device and run through the verification checklist:
* BLE advertising visible in nRF Connect
* Both microphones recording (test with firmware audio loopback)
* Wi-Fi scanning networks
* IMU reporting orientation changes
* LED cycling RGB colors
* Charger dock making contact and charging
All 6 checks must pass before packaging.
Place device in foam insert, close the packaging case. The foam inserts protect the device during shipping.
Packaging STEP files are in [`packaging/cad/`](https://github.com/BasedHardware/omi/tree/main/omi/hardware/consumer/packaging/cad) if you want to manufacture custom retail packaging.
### Reference Photos
Assembly photos are in [`assembly/photos/`](https://github.com/BasedHardware/omi/tree/main/omi/hardware/consumer/assembly/photos):
* [`materials-labelled-exploded-view.jpg`](https://github.com/BasedHardware/omi/blob/main/omi/hardware/consumer/assembly/photos/materials-labelled-exploded-view.jpg) — All components identified
* [`materials-labelled.jpg`](https://github.com/BasedHardware/omi/blob/main/omi/hardware/consumer/assembly/photos/materials-labelled.jpg) — Materials and finish callouts
* [`components-disassembled.jpg`](https://github.com/BasedHardware/omi/blob/main/omi/hardware/consumer/assembly/photos/components-disassembled.jpg) — Individual components laid out
* [`outer-aluminium-covers.jpg`](https://github.com/BasedHardware/omi/blob/main/omi/hardware/consumer/assembly/photos/outer-aluminium-covers.jpg) — CNC aluminium cover detail
### Additional Mechanical Parts
| Part | Specification | Qty |
| ------------------------- | ----------------------- | --- |
| Dust filter | 5.8x4.0x0.1mm | 2 |
| Double-sided tape (small) | D4xd1.5xH0.1mm | 2 |
| Double-sided tape (large) | 14x12.5x0.1mm | 1 |
| Phillips screws | CM1.2x5 | 3 |
| N52 magnets | D3xH3mm | 4 |
| Light pipe | PC, D6xH1.9mm (custom) | 1 |
| S300 glue | 20g/pcs | 1 |
| UV glue | DDY6203\_6 | 1 |
| Necklace rope | 2.5mm, L650mm | 1 |
| Protection cover | 28.7x35.5x11mm (molded) | 1 |
***
## File Integrity
All design files include SHA-256 checksums for verification against the original source files.
```bash theme={null}
cd omi/hardware/consumer
sha256sum -c checksums.sha256
```
SHA-256 checksums for all 58 design files (ZIP, STEP, PDF, BOM, images)
Lay out all components on an anti-static mat. You'll need: tweezers, Phillips screwdriver (PH000), UV lamp, multimeter, and S300 adhesive.
Place the mainboard PCB into the SLA frame on the mounting posts. Board should sit flat with no rocking. Connect the FPC cable to the board-to-board connector.
The FPC connector is fragile — lift the latch before inserting, then press down firmly to lock. Do not force it.
Plug in the 150mAh LiPo battery. Route the cable to avoid pinching. Attach the vibration motor with double-sided tape.
**Battery polarity is critical.** Reversed polarity will destroy the BQ25101 charger IC and may cause thermal runaway. Verify polarity with a multimeter before connecting.
Apply UV adhesive to magnet seats. Insert 4x N52 magnets (D3×H3mm). Cure with UV lamp for 30 seconds each.
Test magnet polarity against the charger dock BEFORE gluing. Mark each magnet with a Sharpie. Once cured, they cannot be removed.
Place the silicone pad over the battery/motor assembly.
Attach aluminium covers (Case A front, Case B back). Secure with 3x Phillips screws (CM1.2×5). Apply S300 glue around the seam.
Before sealing: test charging contact continuity, verify BLE advertising, confirm both mics record audio.
Power on the device and run through the verification checklist:
* BLE advertising visible in nRF Connect
* Both microphones recording (test with firmware audio loopback)
* Wi-Fi scanning networks
* IMU reporting orientation changes
* LED cycling RGB colors
* Charger dock making contact and charging
All 6 checks must pass before packaging.
Place device in foam insert, close the packaging case. The foam inserts protect the device during shipping.
Packaging STEP files are in [`packaging/cad/`](https://github.com/BasedHardware/omi/tree/main/omi/hardware/consumer/packaging/cad) if you want to manufacture custom retail packaging.
### Reference Photos
Assembly photos are in [`assembly/photos/`](https://github.com/BasedHardware/omi/tree/main/omi/hardware/consumer/assembly/photos):
* [`materials-labelled-exploded-view.jpg`](https://github.com/BasedHardware/omi/blob/main/omi/hardware/consumer/assembly/photos/materials-labelled-exploded-view.jpg) — All components identified
* [`materials-labelled.jpg`](https://github.com/BasedHardware/omi/blob/main/omi/hardware/consumer/assembly/photos/materials-labelled.jpg) — Materials and finish callouts
* [`components-disassembled.jpg`](https://github.com/BasedHardware/omi/blob/main/omi/hardware/consumer/assembly/photos/components-disassembled.jpg) — Individual components laid out
* [`outer-aluminium-covers.jpg`](https://github.com/BasedHardware/omi/blob/main/omi/hardware/consumer/assembly/photos/outer-aluminium-covers.jpg) — CNC aluminium cover detail
### Additional Mechanical Parts
| Part | Specification | Qty |
| ------------------------- | ----------------------- | --- |
| Dust filter | 5.8x4.0x0.1mm | 2 |
| Double-sided tape (small) | D4xd1.5xH0.1mm | 2 |
| Double-sided tape (large) | 14x12.5x0.1mm | 1 |
| Phillips screws | CM1.2x5 | 3 |
| N52 magnets | D3xH3mm | 4 |
| Light pipe | PC, D6xH1.9mm (custom) | 1 |
| S300 glue | 20g/pcs | 1 |
| UV glue | DDY6203\_6 | 1 |
| Necklace rope | 2.5mm, L650mm | 1 |
| Protection cover | 28.7x35.5x11mm (molded) | 1 |
***
## File Integrity
All design files include SHA-256 checksums for verification against the original source files.
```bash theme={null}
cd omi/hardware/consumer
sha256sum -c checksums.sha256
```
SHA-256 checksums for all 58 design files (ZIP, STEP, PDF, BOM, images)